Hi all
Since leaving my job late last year and starting out on several new careers, which together comprise a patchwork part-time week, I have been able to devote much more time to my hobby. It has been an exciting and motivating period!
If you have not seen my new site, check out www.mechanicalbranchmodels.com.au. I am busy adding to the range and letting my imagination go. So many ideas to explore and models to create! I hope to announce some more new products very soon.
Kingsvale? Well, that has been progressing, but more slowly. In between those stifling hot days and then weeks of rain and showers, I have been building a French workbench, using silky oak timber from a dead tree we had removed in our backyard. Now that the bench is nearly finished (and it's a monster of a thing - great for clamping and work-holding) i can use it to build the backscenes and pelmets for the Demondrille modules; a slightly revised design to the ones I did so far for Kingsvale.
More soon.
James.
Kingsvale, NSW 1963

A view of Kingsvale station, looking north towards Cowra c1963. Courtesy Ken Ames, "From Grease to Gold Braid".
Thursday 13 April 2017
Tuesday 4 August 2015
Ballasting problems
G'day viewers
Here are some photos I took a while back of the corrosion caused by ballast cement.
I thought it may have been due to the flux I use to solder, but because it has only appeared where I used Chuck's ballast cement, I have to blame that. All the other parts of the layout are unaffected.
I don't know what's in it exactly, but the rail has adopted a very un-protoypical filigree look (nickel-silver oxide must look a lot like copper oxide).


Going to be a pain in the bum cleaning it off the finer details of pointwork and rodding.


Here is the culprit.
Has anyone else had this experience?
Cheerio
James
Finally some progress
After over six months since my last post, I have something new to share!
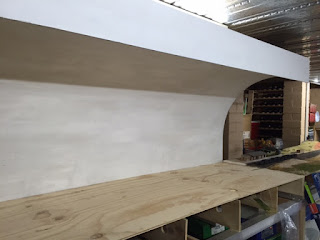
Having to absorb and dispose of my Mum's possessions after she moved into a nursing home prompted a rationalisation of "stuff". To cut a long story short, this resulted in construction of new, more space-efficient shelving which doubles as a support structure for the layout. I've also built my first backscene structure and pelmet which I will replicate for the other modules. The ply backscene has been given a coat of gesso in preparation for the artistic part.
The photos show where I'm up to. The new module adjoining Kings Vale will allow me to complete the station and yard.


Height of the track bed is approximately 1.35m which is a good compromise given the limited headroom of the room and the amount of storage underneath I need.

The shelving underneath holds more boxes than the equivalent Ikea shelving I was using. Longer term, I'm planning to replace plastic boxes with ply boxes. Plastic is fast and cheap, but over time the plastic breaks. The taper of the plastic boxes also reduces their efficiency.

The original module has sustained some damage to the track. It's also corroded in some areas. so a bit of remedial work will be required there. I also want to improve the look of the ballast. It's too clean and modern for the era and location.

I haven't attached the baseboard yet. I want to put in some cut-aways etc to improve the contours and put in a little creek towards the left (southern) end of the scene. The face of the pelmet will eventually be painted black with "Kings' Vale" in white lettering.
Until next year ;-)
James
Friday 19 December 2014
LFX Part 2 - Weathering
Doing a bit of research through my library, I found a few great photos to help with the weathering of the LFX.
The first one shows a BX, but the livery is what I'm trying to reproduce, right down to the faded tuscan, the dust, rust and grease on the underframe and bogies and the wear of the paint on the door frames, particularly the bottome edge. Also of note is how the frosting on the toilet windows has worn off.
Not all the window frames appear to be tuscan either. Some are russet.

from Time of the Passenger Train, First Division, R.G. Preston, page 81.

Page 81
Time of the Passenger Train, First Division
This photo is only a very small part of an LFX, but enough to give a good idea of the colour of the window frames, the wear of the tuscan paintwork on the lower body and the weathering of the underframe.

Time of the Passenger Train Third Division, page 46.
Otford station. Undated photo by RG Preston
This one shows some great detail of the end panelling, handrails and hoses on the headstock. While I'm not modelling the version with the panelled end, the grime which has worked its way into the corners is clear.

From Time of the Passenger Train, First Division. page 97
"All side-loading carriages were fitted with two small jumper cables on the head stock and these were used to carry the alarm system circuit. This BX car also has end step and handrails used to give access to the water filling plugs on the roof. Photo: Jim Hampson
So, from the prototype to the model:


I'm also experimenting with lighting, aperture and shutter speed. Some additional lighting has been used here to highlight the colours of the underframe.


The final photo shows the LFX behind my other big achievement for the year, the men's toilet block.

Thanks for having a look at my blog and your comments and encouragement through the year. I wish you all a great Christmas and New Year!
James
Saturday 29 November 2014
LFX Part 1
I was keen to complete a model to display at the New England Convention. One that I've been eager to build was one of the two Mike McCormac Models LFX kits I bought some time ago. I saw the effort Mike put into the design of these kits and the accuracy he was aiming for and knew they would be a joy to build.
I did get the kit to a stage where I could display it at Armidale, but I didn't finish all of the windows or the weathering. More on that later.
As I expected, the kit does go together beautifully - everything fits so nicely. There are some steps that are quite fiddly, but the design is well thought-out and the result is worth the effort. There were a few times where I was crawling around on the floor trying to find a tiny brass part which had been ejected from the tweezers...
Here is a photo of a trial fit of the roof in the body.


Here is one of the bogie assemblies,which are a combination of brass etches, lost wax and epoxy castings. They run very nicely and are highly detailed.


I was quite satisfied with the paint job - seems that I'm starting to master the air brush at last.
After this, the decals were applied and a coat of Dullcote applied.
All was going very nicely. but after finishing the second side I turned the model back over and found that my beautiful paint job had turned white! I think the enamel thinners had reacted with the Dullcote, and resulted in a white, chalky finish.
I tried a few methods to get the chalk off, including enamel thinners which ate through the paint and removed a decal. A few swear words were uttered. Weathering is normally pretty tolerant to disasters, but this was getting ridiculous!
I found that scrubbing with a fairly stiff brass brush got rid of most of the chalk, but left enough on to provide a weathered, sun-bleached finish, It looked quite good! Saved!
This is pretty much the state the model was displayed in at Armidale:


Cheers for now
James
Sunday 16 November 2014
New England Convention
Hi all
While the world leaders were in Brisbane for the G20, another great and important event took place in Armidale: the New England Convention. This was my first NE convention, but hopefully not my last. The format allows lots of time to chat with friends and make some new ones; all of whom happen to be very competent modellers!
The people, presentations, models, trade stands and layouts provided much inspiration.
I'm aiming to be more active in both my modelling and in presenting my progress here - so cheers to that!
James
Saturday 4 October 2014
Long overdue...
...for an update. The good news is that I've finished studying and completed my second degree which has given me a lot more time for modelling. The interest and motivation is still there, but I've been concentrating recently on building some of the many kits I have stashed away. That's for another post, but in the meantime here are a few photos to show where I am with Kings Vale.
The toilet block has been placed a the up end of the platform and the station sign is done and gives the layout an identity.


This tree shows the green-grey fungus which often grows on the southern face of tree trunks.

I am not completely satisfied with the foliage on this tree, so will come back to it. I found the two Wild Swan books on modelling trees excellent, and a recent visit to London allowed me to acquire all the various materials used in those books for representing branches and foliage.
This view shows the now installed toilet block and the static grass and other landscaping I have completed.


Attempting to re-create the colours and types of foliage, soil and gravel around the station area.
With the landscaping of this module almost complete, I've started working on a second module which is the southern end of Kings Vale, but I'm thinking that this should also be an off-stage staging yard so that I can assemble and run some trains.
One of the "interesting" problems I have is the Simply Glues ballast adhesive is corroding the track. It's easily removed, but clearly it's more than PVA, water and detergent in that stuff!
Subscribe to:
Posts (Atom)